
Maintaining a perfect heel command while walking your dog shouldn’t seem like a constant battle. If you have fallen into a habit of continually correcting your dog while heeling, then your dog might be assuming that correction is part of their daily walking routine. It is only fair that your dog understands what you are asking of them and that you are consistent in expecting the same results no matter what the environment has in store for you during your walk. To get you and your dog out of some bad habits, here are ten tips you can apply to your heeling, along with video demonstrations.
What is a Heel?
For these tips, it is essential that your dog first understand the basic command “heel.” The definition of “heel” is when your dog walks with a loose leash on your left side. Their shoulder is parallel to your knee at all times in and out of motion. The leash should remain loose at all times during your walk, and if you stop walking, your dog should also stop and automatically go into a sit position.
Heel Tip 1: The 180° left turn into your dog
Use this move when you find yourself constantly correcting your dog for forging (consistently ahead of you by less than 12 inches). Typically, these are the situations where your dog has become desensitized to the prong collar. The constant expectation of getting corrected means that your dog has learned to shut off the information you are trying to give them through the correction. As an alternative to constant corrections and warnings, once you feel your dog starting to pull forward, make an abrupt 180° turn into your dog. As soon as they touch your leg, say “No” and pop the leash away from you.
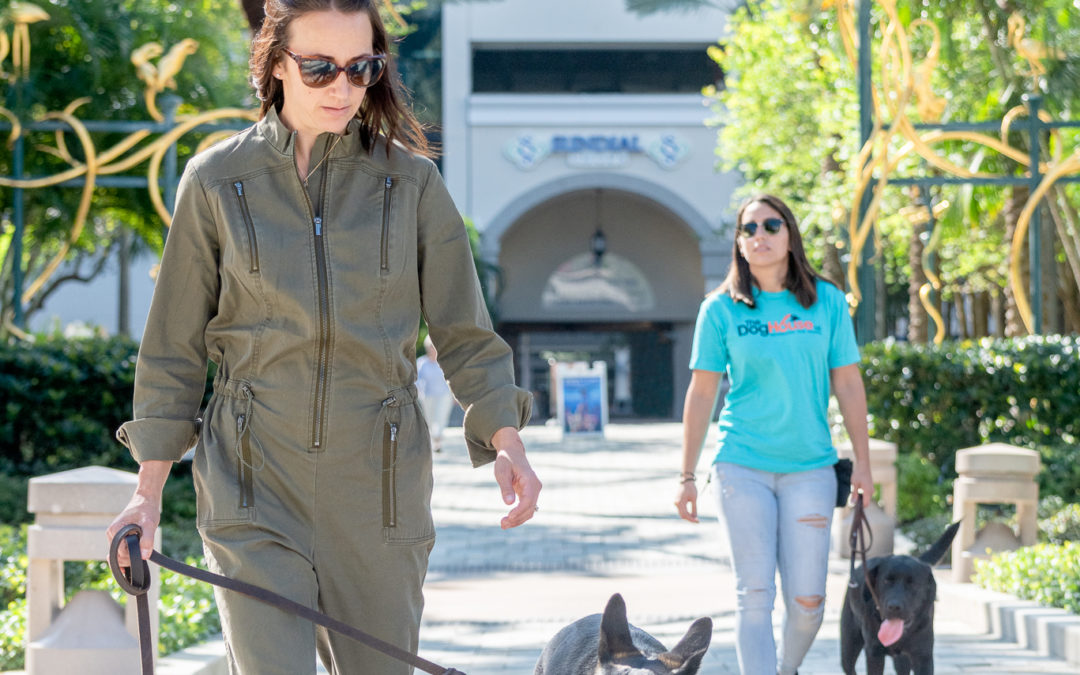
Heel Tip 2: Go for a Walk, a Long Walk
A dog cannot correctly practice the heel command on a short walk around your yard, from your house to your car, etc. So break out your walking shoes and take them on a long walk! The longer the walk, the better they will settle into the heel position.
Heel Tip 3: Practice rewarding while walking (not just rewarding when they auto-sit)
Using a soft treat (that they can eat while walking), reward your dog for being in the correct position using your left hand. Keep your treat pouch positioned on your left hip to target where you want your dog to be. This exercise is excellent for dogs with a high food drive because they continually anticipate the next reward. As you get more fluent in giving the treat, you can practice this at any point during your walk. In the beginning, you will need to walk slower to ensure you are not dropping food on the ground. It is important to only reward during the motion of the walk and not confuse this exercise with an automatic sit.
Heel Tip 4: Stop and check your position periodically by using the automatic sit
Your dog has learned while in training that when you stop walking during the heel, it is their job to go into the sit position without you having to tell them the command sit. This unspoken exercise is called an automatic sit, and the dog has to be paying attention to you and your pace to be successful. When practicing this exercise, before you come to a stop, try taking a few steps to slow down (a good analogy is when you’re driving, and the car in front of you puts on their blinker to signal they are turning.) By slowing down for your dog, you put on your blinker and prepare them for something to happen! If your dog doesn’t go into an automatic sit within 5 seconds, say NO and then give a correction on your leash straight up in the air. Once the dog sits, you can say, “Good Sit.”
Heel Tip 5: Be a Leader, not a follower
This exercise ensures that your dog understands that no matter the distractions in the environment, following your leadership is what’s important. Often, dogs can appear to be walking with their person, but they are on autopilot (only going through the motions of the heel.) The dog is not paying attention to the leader of the walk. Their mind is engaged more with all the distractions of the environment. In this case, the “leadership exercise” is excellent to practice with your dog. It takes them out of the formal expectations of the heel command, and you can tell where the dog’s focus is. All I am looking for is a giant follow the leader game. Whenever the leash is on, your dog should look to you for direction.
6: The leash over the head boundary
Dogs are sensitive to boundaries. To create an invisible boundary during a walk, swing your leash in a counterclockwise circular motion and gently tap the leash on the dog’s nose if it happens to be too far ahead. Simultaneously, you can pair it with a quick pop with the prong collar, or when the leash touches the dog’s nose, you can also pair the electric collar. Doing this makes the dog more aware of the “invisible boundary.” The demo video below helps to clear any confusion:
7: How to show your dog they are allowed to use the bathroom on a leash
The heel command should be constantly reinforced and expected while on walks. If you want your dog to be allowed to have the freedom to roam, sniff, or go potty while on a leash, then you need to signal to them they don’t have to be in the heel position. If you have your dog on your standard 4 or 6-foot leash and you want to release them to “go potty,” then put the dog on your right side. Now they are not expected to be in the “heel” position as described in this video:
8: Be creative
Have fun with your dog and generalizing the “heel” command in various environments (downtown, farmer’s markets, boardwalks…). You can also incorporate the same rules expected during walks while biking, rollerblading, skateboarding. The possibilities are endless!
9: Use your tools correctly
It is essential to make sure that you are not desensitizing your dog to the training tools. Ensure you are not continually correcting your dog on a walk using two collars, and be intentional about the correction you give on the prong. This approach is the next step in fading off of the prong collar to a buckle collar.
After practicing many sessions, a time will come that you haven’t relied on your prong collar. The next step is to take the dog to numerous environments. When few corrections are needed, you are ready to switch solely to the buckle collar no matter the environment.
10: A healthy balance
Even when maintaining a perfect “heel” position, it is still important to let your dog be a dog! So don’t forget to give them a little break, especially when you have mastered all these tips. At any point when the dog is under the OK (release command), and you say “heel,” they should go back into position as you walk away. I like using a retractable leash when practicing this. Keep a healthy balance when out walking so that the dog still gets to enjoy sniffing and just being a dog.